
by Connie Oswald Stofko
If you want to add color to a winter garden, try this easy craft project that even kids can do.
The instructions are pretty simple. Take a balloon, squirt some food coloring inside the balloon, then add water the way you would if you were making water balloons during the summer. As you add water, the food coloring will get mixed.
Put the balloon outside and let it freeze. When the water is frozen solid, snip the balloon, peel the balloon away and you’re left with a colorful frozen sphere.
However, there are some tricks to this project, especially if you want to make large spheres.
I used 11-inch balloons. For softball-sized spheres, fill the balloon just part of the way. They will take about a day to freeze.
To make the largest spheres, which are almost the size and weight of a bowling ball, fill the balloon as much as you dare. Remember, if it pops in the house as you’re filling it, the water that sprays all over will have food coloring in it.

The larger spheres are a little tricky only because they take a surprisingly long time to freeze. Even with weather in the teens, it takes about three days for them to freeze completely.
I thought they would be ready overnight, so the next day I nudged one with my toe and it shattered, spreading colored water and slush all over the porch.
Tip: I didn’t try this, but I think it would be helpful to set your balloons on a newspaper so the balloons don’t stick to your porch, driveway or other surface. Even if the balloon sticks to the paper, you can lift the whole paper if you want to move the balloon. If you use several sheets of paper, you’ll have something to absorb the water in case a balloon breaks before the sphere is frozen.
Even after being outside for a second night, the large spheres weren’t completely frozen. The upper shell of the sphere was thick, but the crust on the bottom was thin. As I tried to move one, the balloon ripped and water and slush started leaking out the bottom, so I quickly flipped it over. I added more colored water to replace the water that was lost, then, because I’m not patient, I stuffed some snow into the hole to try to speed up the freezing process. This was the yellow one, which you can see below.
Because the top freezes more quickly than the bottom does, turning the balloon over may help the sphere to freeze more quickly. Even if it doesn’t freeze faster, it should make them freeze more evenly so you don’t have a thin, brittle bottom. I noticed today that one of my medium-sized green spheres isn’t as green as it used to be. I think it was still liquidy inside and the bottom must have broken, allowing the colored water to leak out.

While we’re talking about speeding up the freezing process, let’s address the question of whether hot water freezes more quickly than cold water. While cold water usually does freeze more quickly than hot water, it seems that under certain circumstances, hot water can actually freeze more quickly than cold. There’s a simple explanation of the science at the Good Thing of the Day website and a more in-depth discussion at Scientific American. I don’t think using hot water would speed up the freezing process with this particular project, but leave a comment if you think it would.
There are two things to notice about the shape of the spheres. First, the bottom will be flattened. This is more noticeable in the large spheres than it is in the small ones. Second, there will be an air bubble in the balloon, which will leave a dent at the top of the sphere. You can see the dent in the yellow sphere above.

That dent bothered me a little, so I thought that adding small shapes to cover the dents would be interesting. I froze some colored water in an egg carton, but you could use rounded ice cube trays or any other mold you like. I’m trying to convince myself that the little red dots look like maraschino cherries on an ice cream sundae, but I think the arrangement looked better without them.
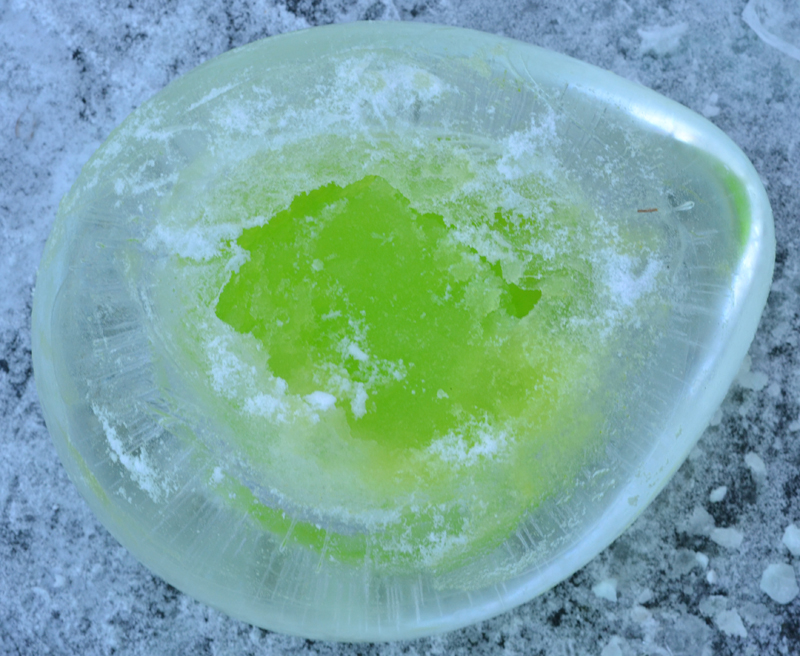
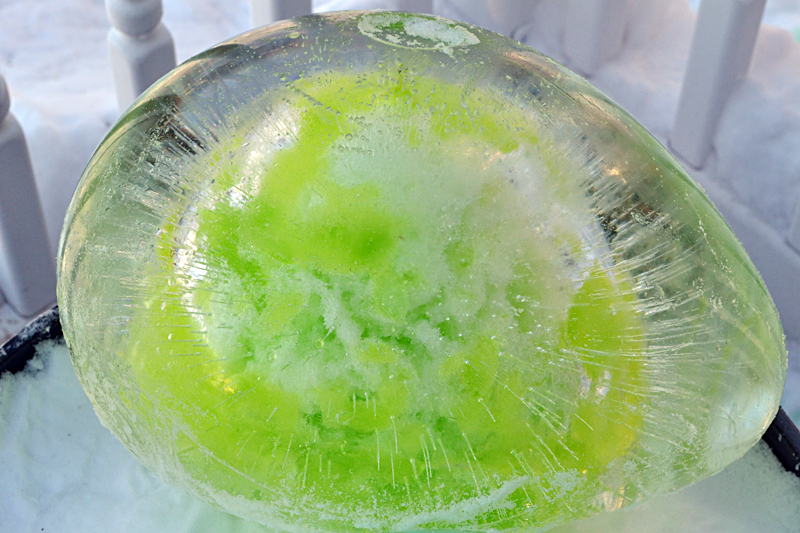
Let’s talk about the color of the spheres. Notice that the smaller spheres are a nice solid color, but the large ones have the color concentrated in the center. I think what must have happened is the large spheres took so much time to freeze that the dye settled out. If you don’t like that look, you may want to gently turn or shake the large spheres once or twice a day to try to keep the food coloring mixed in.
I used white balloons, which proved to be helpful because I could see a hint of color through the balloon. That helped me keep track of what colors I had made.
It’s fun to mix the dyes to get various shades of color. You could do this project in Christmas colors. (I had some pretty red spheres, but managed to break them all. Did I mention that I’m not patient?) You could also choose the colors of your favorite school or sports team. If you want white, make snowballs.
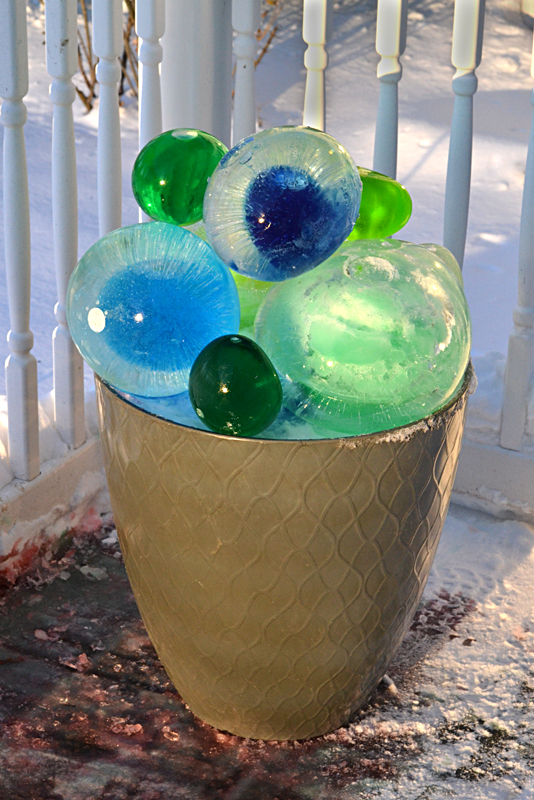
Once you have some frozen spheres, how can you display them?

You could set them along a porch railing if it’s wide enough. You could line them up along a walkway or driveway, but remember that if it snows, you’ll have to shovel the snow elsewhere.
I decided to arrange mine in a large plastic pot. I filled the pot with snow and set the largest spheres on the snow. I set smaller spheres on top of those. Realize that where a sphere settles is where it will be most stable. I tried to nudge a sphere slightly to the left, but it slid away and smashed on the floor. Once you have a sphere in a spot, pour water where it touches the other spheres. The water will freeze and act like glue.
I glued the small red ice dots to the spheres by dipping them in water and holding them in place until they were secure. With weather in the teens, it didn’t take long.
Final tips:
- If you’re impatient, make small spheres.
- Make more spheres than you think you will need in case some break.
- Don’t do this project near steps because it can create an icy mess. Even if your spheres freeze solid and they don’t break the way so many of mine did, they have to thaw sometime. If we get a warm spell followed by freezing overnight, the area around your arrangement could get slippery.
If you try this, email me a photo at connie@buffalo-niagaragardening.com or connie@buffaloniagaragardening.com (with or without a hyphen). I’ll post them on the Your Photos page.
Update: See how to add cup-shaped candle holders made of ice.

Hi Diane, it’s the same way you fill water balloons. You stretch the opening of the balloon and put the opening of the balloon onto the opening of the faucet. You turn on the faucet. I hope that helps.
Don’t understand how you got the water in the latex balloon. Mine do not expand as the water is going in!!!
Thank you so much for all those tips on making ice spheres. It’s good to know I’m not the only one who makes a mess when I do projects.
What a GREAT idea! Two tips to consider….first, if you are not prepared with the right tools, you WILL have a food-coloring stained mess on your hands. (If you DO blow up a water fountain of colored water on yourself, put anything that got stained immediately into the clothes washer with a scoop of OxyClean, as I did, and it all came out without issue.) For tools to help the process go smoother, I got a faucet/hose adapter at hardware store ($7), and put that on my utility sink faucet, and then used our pocket hose with a pointed hose tip adapter to fill the balloons. I filled balloons in the sink on top of an old sheet which helped hold some of the balloon weight while filling. Then, after you fill the balloons….SLOWLY allow the bubbles of air to escape so the amount of air left in your balloon is next to nothing. Then I set them all in a large plastic bin (one of those you can slide under the bed for storage) and made sure all the balloons were standing up with the knot on top….this eliminated the dent. Very cool project. Once I had the right tools, the process took me less than 30 mins. OH….one more thing…I tried using dried food coloring, and gel food coloring – NOT good. Stick with the liquid drip/drop coloring containers. :-/
Molly, very cool (pun intended)! Thanks for writing.
What a great idea! This was the perfect week in Rochester to try this. They look great on my porch! Thanks
Stella, Este es un buon idea per una fiesta.
Stella,
My Spanish isn’t very good so I will reply in English. Yes, I think you could use a freezer if your weather isn’t cold enough. You could even display the finished arrangement indoors for a short time.
Where are you from? Did you miss the cold weather that affected almost all of the United States for the past several days?
Thank you for writing.
HERMOSA IDEA NO CREO QUE ACA RESULTE PORQUE NO HACE TANTO FRIO EN LOS INVIERNOS PERO VOY A PROBAR EN EL FREEZER
Great idea! I will certainly try it. Thank you.
I love this idea. What a cool way to dress up your Winter Landscape and containers. Thank you for sharing, Connie!
David Clark
These are so pretty!
Neat, Neat, Neat. I will try it.
What a lovely idea, one I haven’t seen in all the other gardening feeds I receive.
Oh my goodness your article made me laugh! I am not that patient either, so I get it. They are beautiful so I am going to try it!
This is such a great project. I love the idea. If the weather holds, I will be trying it as well.
Very pretty.
Love, love, love this project, Connie! I’m definitely going to try it – after we have our 40° day and get back to winter.